Thursday, December 1, 2011

Holiday Musing

I just finished eating the last of the turkey in my fridge. I'm already going through turkey sandwich withdrawal—that perfect combination of cranberry sauce and mayonnaise oozing out the sides ... God. Thankfully, I wrote down my menu so I can enjoy the same mouth-watering leftovers next year.

Even though I kept things very low-key, I think my Thanksgiving anxiety always lies in the fact that 365 days have passed since I last manhandled a turkey. It's like Groundhog Day every year, and while it was helpful to have all of the recipes written down, what I really needed was some experienced advice from me to me. Something like, "Don't worry. Just think of it as a large chicken." Or, "You made the pies the night before which was pure genius. Instead of waking up at the crack of dawn, you sipped your cappuccino while watching the Thanksgiving Day Parade. Well played."

Since I kept my Thanksgiving menu simple, I had more time to play with setting the table. 'Tis the season to be crafty! I decided to do a big flower arrangement, inspired by an old, rustic bread bowl my grandmother gave me. When I arrange flowers I love to gather different sizes and textures, all within the same color scheme. I bought the hydrangea and the eucalyptus berries at WholeFoods while I was on my Thanksgiving grocery run. Eucalyptus berries are one of my favorite go-to flowers because they look great with everything and they're very low-maintence. A few days later I saw the small cabbage flowers at the farmers' market and thought they'd work well. I bought a floral oasis and a cheap plastic container at a store in the flower district (28th + 6th Ave) so I could just rest the base inside the bowl.

The arrangement looked really beautiful on the table.

The hydrangea dried perfectly in the oasis and so I saved them for my Christmas decorations. When Billy and I bought our Christmas tree, I scooped up a huge pile of tree trimmings that were just laying on the ground; they smell amazing and look great strewn around the house. I used some of the branches, along with the dried hydrangea, to make a holiday wreath for my front door. I bought a wire wreath frame today from the flower district (now you know where to find me when I'm not teaching yoga) and some winter berries, which I thought would made the Victorian-looking dried flowers more modern and fresh.

Ideally it's best to work on a table, but I actually sat in Malasana and experienced some killer hip opening whilst I crafted. Using garden shears, cut off 12" pieces of tree branches and wrap 3 to 4 together into a bunch. Lay each bunch across the wire frame and wrap with floral wire. Repeat all the way around the frame until you've created the fullness you desire. I think a simple, green wreath is really beautiful. Last year I used eucalyptus berries with the Fraser Fir branches and I loved the different textures, all in green.


A homemade wreath lends something unpredictable to holiday decorations. It's also a feat worth celebrating, and the finished product hangs like a trophy on your front door. "I made that," you'll say! They also make thoughtful, inexpensive gifts that mean so much because the recipient will think of you every time they walk into their home.

Have fun with your holiday decorations. Making them yourself will definitely put you in the spirit of the season. Creating beautiful things with your hands is just another form of artistic concentration and self-expression. It'll be your very own crafty, holiday meditation.

Sunday, November 20, 2011

Orange Spice Aromatherapy


It's getting chilly outside and my apartment windows are sadly more closed than open these days. Trading a fresh breeze for some warmth, my home starts to smell stale, what with the remnants of last night's dinner or the perfume of my beloved dog lingering in the air.

My remedy? A pot of boiling water simmering on the stove, filled with the peel of one orange, 1 t cinnamon, and a small handful of cloves. Your house will smell like a magical holiday wonderland. Staying toasty indoors has never smelled so good.


Thursday, November 17, 2011

Tittibhasana


Tittibhasana is a challenging asana, requiring an ability to simultaneously expand and contract. The inner thighs and hamstrings need to be open and supple, while the abdominals, hip flexors, and serratus anterior (responsible for spreading the shoulder blades apart) all need to be on call and ready to act. This pose gives us an opportunity to practice the balance between two opposing forces, teaching us that when we connect to our center, we gain the stability to fly off into boundless space.

Component Parts:
inner thighs
hamstrings
abdominals
spine

Actions:
protraction of scapulae
flexion of spine/hips
adduction of thighs (squeezing thighs into shoulders)
extension of leg at knee

Prep Poses:
Supine Knee Extensions - hold block behind thigh, press thigh forward into block and extend heel to ceiling to straighten knee
Supta Padangusthasana 1 + 2
Urdhva Prasarita Padasana
Cat pose into Chaturangasana
Garudasana arms
Downdog into Updog 3x - block between ankles, roll over toes
Downdog knee-to-nose, Downdog knee-to-outer arm
Parsvakonasana variation - hand on block inside foot, press knee/shoulder together
Standing vinyasa - Prasarita Padottanasana (concave spine) into Parsvottanasana into Lunge variation - both hands inside foot, press knee/shoulder together, lower back knee, option to lower forearms to blocks/floor. Repeat other side.
Malasana
Rolling Vinyasa (cover mat with blanket) - Tadasana, Urdhva Hastasana, Utkatasana, Malasana (arms reaching forward/inside thighs), roll on spine into Halasana (arms above head), roll up into Navasana, roll back into Halasana (arms above head), roll up into Utkatasana, Urdhva Hastasana, Tadasana
Marichyasana A
Baddha Konasana
Upavistha Konasana
Happy Baby + Half Happy Baby

Contraindications:
Wrist, shoulder, hamstring, or groin injuries. Sciatica or spinal herniations.

Props:
Blocks under hands for tight groins/upper back.

Stand in Tadasana with feet slightly wider than outer hip-width apart. Hinge at the hips, coming into Uttanasana. Weave the right hand through both legs and place it on the back of the right calf. It's helpful to create the shape of a "V" with your hand by separating the thumb and index finger. Use this hand position to press forward into the calf, leveraging the right shoulder behind the right thigh. Repeat with the left hand. Breathe well, using your exhales to continue shimmying your shoulders more and more behind your knees.

Strongly hug your shoulders with your thighs, allowing you to release your hands from your calves. Place your hands on the floor (or blocks) behind your feet. Slowly begin to shift the weight into your hands and "sit" on your arms. Push your hands into the floor and draw your abdomen in and up. Walk the feet towards one another and cross one ankle over the other. Continue to broaden your upper back as you simultaneously spread your collar bones. Pull the feet against each other and continue squeezing your thighs strongly into your arms. This is Bhujapidasana.

Concentrate on the feeling you had in the preparatory pose where you held the block behind your thigh, resisting yourself as you extended your heel up towards the ceiling. From Bhujapidasana, press your thighs down into your arms, as if they were the blocks, and extend your heels forward, straightening your knees. Hold for a few breaths and observe the play between drawing in towards yourself while expanding your chest and legs.

To release the body after the pose, try these counter postures:
Padahastasana
Gomukasana
Restorative Bridge
Supta Baddha Konasana

Sunday, November 13, 2011

California Style

I just got back from an amazing vacation in California, where my beloved and I spent a leisurely week driving down the coast (from San Fran to San Diego)! Highlights of the trip included a motorcycle ride through Sonoma, breathtaking views on Highway 1, and an amazing birthday dinner at Chez Panisse. The change of scenery and the laid-back, sunny vibe did my soul a world of good.

What I didn't expect was to be so totally smitten with California's effortless style. Relaxed, bright, and full of texture, everything felt fresh and of-the-moment. I came back East craving a complete overhaul of my home. Thankfully, small details can create major change and so I've pinpointed some of the style elements I fell in love with on my trip.

Black and Gold

This is a picture of the lobby at the Sheraton in Santa Monica. I loved everything about the decor.

Back in NYC, I found these black and gold lamps at ABC Carpet & Home. They're also hanging at J.Crew on 5th Avenue.

The base of this lamp from Restoration Hardware is made of mercury glass, but the lampshade's gold inlay casts a warm glow and creates the illusion of antique brass.


Succulents

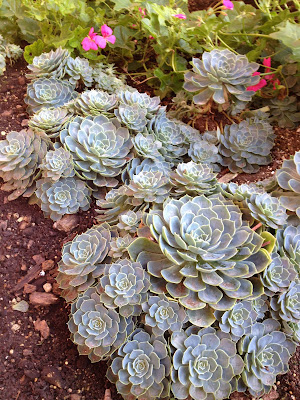
There were succulent gardens everywhere, both wild and tame. They would look beautiful inside an apartment.


Natural Wood

The boardwalk at Pebble Beach.

I saw tons of wine barrel chandeliers on my trip. I love the modern feel of the one below from ABC Carpet & Home. You can find more traditional versions at Restoration Hardware. John Derian sells antique ones that will make you weak in the knees.

A stack of wooden cutting boards at ABC.


Texture

Artwork looks striking against the dark linen wallpaper. The textured fabric adds warmth and dimension to a room.


White-on-White

I saw tons of art displayed in white mat/white frame. This giant collection of black and white prints looks great against the seagrass wallpaper. You can find white-on-white framing at Pottery Barn, West Elm, etc. This is definitely the easiest and cheapest way to update the look of your decor.


Lacquer

Lacquer is probably one of my favorite design elements because it instantly updates a more traditional home. The glossy texture covered everything, from furniture to accessories. I bought the white tray from West Elm to store my jewelry. The ceramic bowls with gold inlay are from one of my favorite NYC stores, Ochre.


Sunday, October 2, 2011

Butternut Squash Risotto

Today was sublime...the kind of sublime that can only be appreciated when juxtaposed with what feels like months (and months) of non-stop work. My gratitude arrived the moment I woke up and stared at my alarm clock. 10am! The sun was shining and that crisp Fall air put a pep in my step. I had the entire day to myself—no work, no obligations—and I felt relieved to have this precious time to refill my well.

I spent the afternoon in my kitchen, experimenting and channeling my energy and inspiration from the autumn weather into something I hoped would taste as good as I felt. Craving a good, earthy dish expressive of the season, I decided to make butternut squash risotto. It's still light, like the weather, but introduces the heartier tastes of Fall.

Everyone needs to know how to make risotto. I know...you're scared, but you need to roll up your sleeves and try. You must, otherwise you're going to miss out on this killer recipe (and succumb to your limited beliefs about your abilities in the kitchen). I'm not sure which is worse.

The key to risotto is practice, patience, and faith. You need to get used to the feel of risotto—its nuances, personality, and texture—and so you should commit to making it often. The beauty of risotto is that is has hundreds of incarnations and so you can change the stock and the accessory ingredients to reflect your tastes. Patience is a virtue; it's about 30 minutes of non-stop action start to finish. Faith comes in towards the end, right at the point when you're convinced it's never going to come together and that you should quit while you're ahead. That's when you have to keep moving forward. It's just like in yoga: when you come up against a challenge, do more of the right thing.

The foundation of risotto is actually pretty simple. It's important to have all of your mise en place prepared because once you begin, you can't stop. Cut one butternut squash into 1-inch cubes and toss with olive oil, salt, and pepper. Roast in a 400 degree oven for 30-40 minutes. Finely chop one shallot. Pour 7 cups of stock (your choice: chicken or vegetable) into a pot and bring to a gentle boil.

Melt 2 T of butter in a large pot or Dutch oven (note: put "le Crueset" on your holiday wish list) and sauté the shallots plus 5-10 bay leaves. Add salt and pepper. Once the shallots are translucent, add 1 1/2 cups of Arborio rice and toss for 3-5 minutes. This is the moment when the rice takes on the flavors in the pot, so as you begin to experiment with risotto, you can add different herbs and spices at this point in the process. (Note: saffron would also work well with the butternut squash.)

Now we need to seal in the flavors. Add 1/2 cup of Prosecco and stir until all of the liquid is absorbed. You can also use white wine, but my Italian friend, Pietro, taught me how to make risotto using Prosecco and I think it adds a subtle sweetness, creating a lighter dish.

The rest is history. Add between 1/2 - 1 cup of the hot stock at a time, stirring constantly until all of the broth is absorbed. You will most likely end of using about 5 of the initial 7 cups of stock, but it's always good to have extra liquid available, just in case things don't quite turn out as planned. Taste the risotto as you go, testing the flavor and checking to see where you are in the cooking process. You want the rice to be cooked through but still al dente. The risotto will start coming together gradually, but by the last ladle of stock you will see the signature, creamy texture of a risotto dish. Take one last taste and season accordingly with salt and pepper.

Add the roasted butternut squash and a heaping pile of parmesan cheese (how much, exactly, is up to you). I used vegetable stock today, but it would also taste divine with chicken stock and maybe some sauteed pancetta.

My final thoughts regarding your adventure in risotto are to draw on your experiences from the yoga mat. It's like coming up into a handstand: don't just sit there, strategizing the pose and psyching yourself out. You've gotta kick, dammit. You'll have as much fun with your failures as you will with your triumphs, so crack open a bottle of Prosecco and start cooking!

Friday, September 30, 2011

Homemade Cards


These homemade cards are a great alternative to the expensive options at many stores. I love sifting through vintage photographs at flea markets where you can find sweet, unique, and sometimes hilarious snapshots that make perfect cards for any occasion.


This one is priceless...

I buy blank paper stock and photo corners at Paper Presentation. They make hundreds of different colors, sizes, and shapes.

Tie a stack of homemade cards with a ribbon and you have a beautiful, thoughtful gift.


Sunday, August 28, 2011

My Beloved Egg and Cheese

Someone just recently asked me to name my favorite food of all time. That's a big question. At first I felt a surprising amount of pressure to come up with something impressive—something that would wow their pants off—but then, after I took a step back, I realized that my favorite food is actually quite humble in nature. My heart is eternally devoted to the egg and cheese sandwich. I could eat it for breakfast, lunch, and dinner. It would be my last meal. One might say I'm a connoisseur.

One of my favorite incarnations of the classic egg and cheese sandwich is this Italian-inspired slice of perfection. It's a great meal for brunch or a simple dinner. It couldn't be simpler to make: delicately poached eggs served over garlic-smeared bread smothered in marina sauce and topped with parmesan cheese and fresh parsley. Need I say more? It is beyond divine, good for the soul, and exactly what you should make when you need to smile from somewhere deep inside.

Recipe inspired by Giada DeLaurentiis